A general, handwaving guide to digital photography - part 3
Continued from section 2 (white balance, light metering, exposure compensation)
Topics in section 3
Flash
Point of view
End note
Flash
Used without care, the flash is a very dangerous tool. It can very easily ruin your white balance, brightness and contrast. While I do not usually use flash, I can make some general remarks based on mathematical arguments.
Not surprisingly, the flash strongly affects objects closest to the camera. In fact, the illumination is inversely proportional to the square of the distance. Double the distance, and it is only one quarter as bright. Triple the distance, and you get 1/9. Quadruple the distance, and you only get 1/16
As you can see, the flash’s effect decays very rapidly with distance. If you have several objects (usually people) that would make up the foreground, and you want them evenly lit by the flash, it is best to make sure that they are all about the same distance away from the camera/flash. Otherwise, objects further away will be darker than those slightly in front.
The use of flash is not limited to dark situations. It can be also used to illuminate comparatively dark areas (usually the subject). A common application of fill flash would probably be to illuminate the subject’s face while under intense sunlight from behind/above. Without fill flash, the face would be cast in a dark shadow. To use fill flash, simply turn the flash on, as opposed to automatic or off.
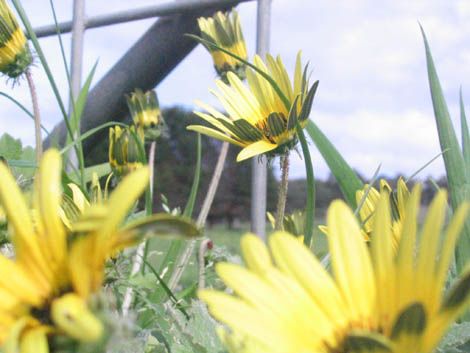
Point of view
Our view of the world usually takes place from a vantage point about 4 to 6 feet above the ground. For novelty’s sake, you could try to shoot from a low point or a high point. While doing so, you might look a little cuckoo to people around you, crouching low to snap a ground level shot, or holding the camera high in the air and clicking blindly. But who cares of what others think, as long as you might be able to get a special flavour into your shots.


For the high vantage point, I like to use a tripod. Extend the legs fully, but do not unfurl them. Set the timer to 10 seconds (2s is too much of mad rush), hoist the camera above the scene and wait for the shutter to click. This is a bit tricky- you will need to get a few initial shots to figure out the composition while you tweak the camera’s angles. Alternatively, you could stand on a chair, hold the camera above your head and click away. Remember to review after each shot to improve learning via feedback, which is particularly important if you are trying to compose shots blindly.
Apart from shooting from different locations, there are many, many ways to add a dash spice to your photos. You can try shooting through gaps and holes, such that the windowsill or foliage frames the subject. Or experiment with glassware, wire mesh and cast iron grilles, mirrors, stainless steel pots, crystal goblets, lace curtains, grass. Anything and everything goes. After all, the digital format does not cost you money beyond recharging the batteries and replacing them when they finally wear down.
End note
Do your own experimenting; I’ve already contaminated (but hopefully not constrained) you with a little of my style.
Most of us do not have the kind of equipment we would like to have, which is really not surprising. Worry not if you do not have a tripod, or a 50mm prime lens, or a cable release shutter, or an Olympus E-300. This is a clichéd but true concept- the most expensive equipment will not guarantee satisfying shots.
As the diligent reader (anyone who worked through 2000 words is probably diligent) might already have noticed, the theme of this guide is experimentation. Beyond a meagre few technical pointers to give one a bit more freedom of choice, there is little else that I can do to magically aid one’s artistic sense. May fortune be on your side (especially in uncontrolled situations such as metrological conditions).
“And don’t point the camera in the same old ‘square-up’ full frontal way. Tip it, angle it – try something different!” - Weatherburn
“[…] go on a walkabout, determined to look anew at what’s outside your front door. At first this may involve a conscious and almost frustrating effort; but once you’ve run a few reels of film through the camera (or fired continuously with that digital camera) you’ll realise you’ve been walking around, perhaps for years, without “seeing” much at all. […] To take interesting and arresting images of your familiar surroundings will take careful observation, concentration, and imagination – but all the while you’ll be developing the important habit of visual awareness.” - Weatherburn
Thank you for reading. It was a pleasure doing this.
Further reading:
“Photography for Beginners”, by lewcid. strongly recommended
Deviant Art
Deviant Art has loads of marvellous photographs (and drawings, paintings, computer graphics). Browse through them; take a close look at the ones you like. Try to see what kind of tricks the artist used to make that photo. Is it the contrast? Colour coordination? Framing?
References:
Rob Weatherburn, “A Photographic Philosophy”, “Australian Photography” February 2005 p.34-37
Photography
Topics in section 3
Flash
Point of view
End note
Flash
Used without care, the flash is a very dangerous tool. It can very easily ruin your white balance, brightness and contrast. While I do not usually use flash, I can make some general remarks based on mathematical arguments.
Not surprisingly, the flash strongly affects objects closest to the camera. In fact, the illumination is inversely proportional to the square of the distance. Double the distance, and it is only one quarter as bright. Triple the distance, and you get 1/9. Quadruple the distance, and you only get 1/16
As you can see, the flash’s effect decays very rapidly with distance. If you have several objects (usually people) that would make up the foreground, and you want them evenly lit by the flash, it is best to make sure that they are all about the same distance away from the camera/flash. Otherwise, objects further away will be darker than those slightly in front.
The use of flash is not limited to dark situations. It can be also used to illuminate comparatively dark areas (usually the subject). A common application of fill flash would probably be to illuminate the subject’s face while under intense sunlight from behind/above. Without fill flash, the face would be cast in a dark shadow. To use fill flash, simply turn the flash on, as opposed to automatic or off.
Point of view
Our view of the world usually takes place from a vantage point about 4 to 6 feet above the ground. For novelty’s sake, you could try to shoot from a low point or a high point. While doing so, you might look a little cuckoo to people around you, crouching low to snap a ground level shot, or holding the camera high in the air and clicking blindly. But who cares of what others think, as long as you might be able to get a special flavour into your shots.
For the high vantage point, I like to use a tripod. Extend the legs fully, but do not unfurl them. Set the timer to 10 seconds (2s is too much of mad rush), hoist the camera above the scene and wait for the shutter to click. This is a bit tricky- you will need to get a few initial shots to figure out the composition while you tweak the camera’s angles. Alternatively, you could stand on a chair, hold the camera above your head and click away. Remember to review after each shot to improve learning via feedback, which is particularly important if you are trying to compose shots blindly.
Apart from shooting from different locations, there are many, many ways to add a dash spice to your photos. You can try shooting through gaps and holes, such that the windowsill or foliage frames the subject. Or experiment with glassware, wire mesh and cast iron grilles, mirrors, stainless steel pots, crystal goblets, lace curtains, grass. Anything and everything goes. After all, the digital format does not cost you money beyond recharging the batteries and replacing them when they finally wear down.
End note
Do your own experimenting; I’ve already contaminated (but hopefully not constrained) you with a little of my style.
Most of us do not have the kind of equipment we would like to have, which is really not surprising. Worry not if you do not have a tripod, or a 50mm prime lens, or a cable release shutter, or an Olympus E-300. This is a clichéd but true concept- the most expensive equipment will not guarantee satisfying shots.
As the diligent reader (anyone who worked through 2000 words is probably diligent) might already have noticed, the theme of this guide is experimentation. Beyond a meagre few technical pointers to give one a bit more freedom of choice, there is little else that I can do to magically aid one’s artistic sense. May fortune be on your side (especially in uncontrolled situations such as metrological conditions).
“And don’t point the camera in the same old ‘square-up’ full frontal way. Tip it, angle it – try something different!” - Weatherburn
“[…] go on a walkabout, determined to look anew at what’s outside your front door. At first this may involve a conscious and almost frustrating effort; but once you’ve run a few reels of film through the camera (or fired continuously with that digital camera) you’ll realise you’ve been walking around, perhaps for years, without “seeing” much at all. […] To take interesting and arresting images of your familiar surroundings will take careful observation, concentration, and imagination – but all the while you’ll be developing the important habit of visual awareness.” - Weatherburn
Thank you for reading. It was a pleasure doing this.
Further reading:
“Photography for Beginners”, by lewcid. strongly recommended
Deviant Art
Deviant Art has loads of marvellous photographs (and drawings, paintings, computer graphics). Browse through them; take a close look at the ones you like. Try to see what kind of tricks the artist used to make that photo. Is it the contrast? Colour coordination? Framing?
References:
Rob Weatherburn, “A Photographic Philosophy”, “Australian Photography” February 2005 p.34-37
Photography
Labels: milestones and such, photography
posted by Tan Yee Wei at 12/09/2005 12:02:00 am
![]()
![]()

<< Home