A general, handwaving guide to digital photography - part 2
Continued from Section 1 (Taking advantage of the digital format, Photo composition, LCD and viewfinder use)
Topics in Section 2
White balance
Light metering
Exposure compensation
I personally like to use the P (Program, I guess) mode on the camera for all occasions. It is automated, but with a large scope of adjustability. The features I find most useful to tweak are white balance, light metering, exposure compensation and flash.
White balance
White balance is the mechanism for which the camera compensates for the colour of ambient lighting. Without it, indoor shots under incandescent lights will appear overly yellow and fluorescent lamps will give a sterile blue tinge. White balance usually comes with settings such as tungsten, fluorescent, daylight, cloudy and of course, automatic.
If you want colours of the sky to be reproduced faithfully, it is recommended that the daylight setting be used. This way, any deviation from white daylight is clearly picked out, like sunset blasts of orange, the silver lining of clouds or the simple blue sky.
Light metering
Light metering is the mechanism by which the exposure is to be adjusted. By measuring the brightness of the image, the shutter speed and aperture is adjusted to allow the correct quantity of light to enter the camera.
Spot metering only considers the light in the middle of the frame, and adjusts the shutter and aperture to expose the middle of the frame perfectly, without regard to the surrounding brightness. Spot metering is usually denoted by a dot within a rectangle.
Spot metering is particularly useful if the composition has parts with very different brightness. The following example will illustrate the point.
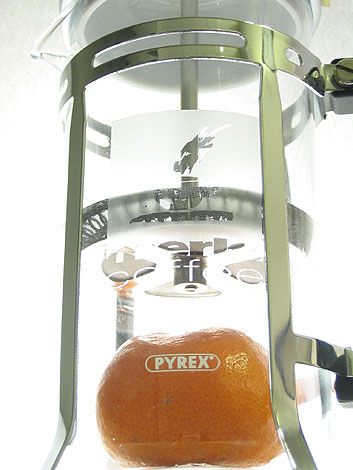
In this scene, the background is a sheet of paper with a bright light behind it. The orange and the coffee press are placed in front of this bright background. Spot metering was used, and the metering was done on the orange (by holding the shutter button halfway down) and then recomposing the image to move the orange away from the centre.
The result is that the orange is well exposed, and the background washed out. If spot metering was not used, the background will probably be properly exposed, and the subject will be very, very dark. This might be good for snapping silhouettes though.
Have a go at spotting the background, the subject, or even the boundary between the subject and the background. In particular, putting the spot metering box on the boundary between the light and dark elements can give an in-between exposure, and the degree of which can be adjusted by moving the spot area slightly towards or away from the bright region.
Exposure compensation
The process of exposure compensation probably comes somewhere between light metering and shutter release. By setting a negative EV (exposure value), the shot becomes darker. Likewise, a positive EV results in a brighter photo. The exposure compensation icon/button on most digital cameras are either marked as EV or with a +/- sign.

I find exposure compensation useful when intending to capture the clouds in a bright sky. If the blue sky is overexposed, it appears whitish on camera, minimising the contrast with any white clouds. By darkening the scene slightly, the sky retains its blue hue, making the white clouds stand out well. In general, negative EV is good for, but not limited to, situations where brightness makes a colour fade, thus reducing its impact.
Very similarly but for the opposite effect, I sometimes use positive EV in still life macro shots when I want a slightly off white background (usually a few sheets of paper) to look whiter than it actually is.
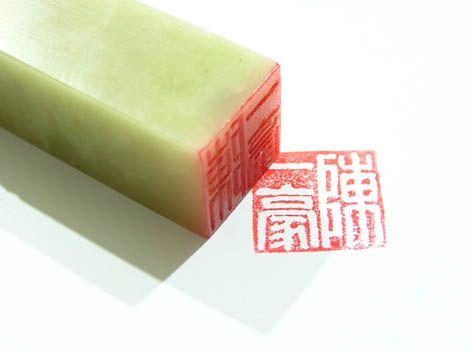
A fine example of the use of over-exposure of the background. The white background is a sheet of paper.
By Tan Yee Hou; more here
If unsure of the outcome, it is usually safer to just shoot a series of the same shot with range of EV and review the results later. Some cameras have a bracketing function, which will shoot several frames of the same scene, each one with an increment in the EV within a user-defined range. Alternatively, one can manually step the EV up or down through the desired range.
Coming up next
Flash
Point of view
Macro photography
Photography
Topics in Section 2
White balance
Light metering
Exposure compensation
I personally like to use the P (Program, I guess) mode on the camera for all occasions. It is automated, but with a large scope of adjustability. The features I find most useful to tweak are white balance, light metering, exposure compensation and flash.
White balance
White balance is the mechanism for which the camera compensates for the colour of ambient lighting. Without it, indoor shots under incandescent lights will appear overly yellow and fluorescent lamps will give a sterile blue tinge. White balance usually comes with settings such as tungsten, fluorescent, daylight, cloudy and of course, automatic.
If you want colours of the sky to be reproduced faithfully, it is recommended that the daylight setting be used. This way, any deviation from white daylight is clearly picked out, like sunset blasts of orange, the silver lining of clouds or the simple blue sky.
Light metering
Light metering is the mechanism by which the exposure is to be adjusted. By measuring the brightness of the image, the shutter speed and aperture is adjusted to allow the correct quantity of light to enter the camera.
Spot metering only considers the light in the middle of the frame, and adjusts the shutter and aperture to expose the middle of the frame perfectly, without regard to the surrounding brightness. Spot metering is usually denoted by a dot within a rectangle.
Spot metering is particularly useful if the composition has parts with very different brightness. The following example will illustrate the point.
In this scene, the background is a sheet of paper with a bright light behind it. The orange and the coffee press are placed in front of this bright background. Spot metering was used, and the metering was done on the orange (by holding the shutter button halfway down) and then recomposing the image to move the orange away from the centre.
The result is that the orange is well exposed, and the background washed out. If spot metering was not used, the background will probably be properly exposed, and the subject will be very, very dark. This might be good for snapping silhouettes though.
Have a go at spotting the background, the subject, or even the boundary between the subject and the background. In particular, putting the spot metering box on the boundary between the light and dark elements can give an in-between exposure, and the degree of which can be adjusted by moving the spot area slightly towards or away from the bright region.
Exposure compensation
The process of exposure compensation probably comes somewhere between light metering and shutter release. By setting a negative EV (exposure value), the shot becomes darker. Likewise, a positive EV results in a brighter photo. The exposure compensation icon/button on most digital cameras are either marked as EV or with a +/- sign.
I find exposure compensation useful when intending to capture the clouds in a bright sky. If the blue sky is overexposed, it appears whitish on camera, minimising the contrast with any white clouds. By darkening the scene slightly, the sky retains its blue hue, making the white clouds stand out well. In general, negative EV is good for, but not limited to, situations where brightness makes a colour fade, thus reducing its impact.
Very similarly but for the opposite effect, I sometimes use positive EV in still life macro shots when I want a slightly off white background (usually a few sheets of paper) to look whiter than it actually is.
A fine example of the use of over-exposure of the background. The white background is a sheet of paper.
By Tan Yee Hou; more here
If unsure of the outcome, it is usually safer to just shoot a series of the same shot with range of EV and review the results later. Some cameras have a bracketing function, which will shoot several frames of the same scene, each one with an increment in the EV within a user-defined range. Alternatively, one can manually step the EV up or down through the desired range.
Coming up next
Flash
Point of view
Macro photography
Photography
Labels: milestones and such, photography
posted by Tan Yee Wei at 12/05/2005 02:19:00 pm
![]()
![]()

<< Home